Showing posts with label Gadgets. Show all posts

Sunday, July 30, 2023

Pixel Green Screen of Death

While on vacation, my Google Pixel phone experienced the Green Screen of Death.  Basically, what happens is that the screen will either not turn on at all, flash a few lines, or flicker a primarily green color before the whole display turns dark.  The phone is still functioning in the background as you can hear the notifications and it still senses your finger touches, but you can't see anything.  

I had a separate tablet with me on the trip so I quickly searched to see if this is a known issue and if there was any easy fix.   Searching on Google, I found out that it's what people call the Green Screen of Death so it's not unheard of, but nobody can fully explain the cause.  The general consensus is that this is a hardware failure and requires the phone screen to be replaced.  The speculation is that it is caused by the phone overheating, but whether it's a defect in the design or manufacturing is still under debate.  I don't have any definitive answers but will share my experience here.  My situation started after I left the phone in the armrest of my rental car for a couple of hours one morning.  When I took it out and turned on the screen, it started flickering and then turned dark.  After a few seconds, the screen came on only to flicker and turn dark again.  The phone felt warm but not burning.  It might have felt a bit warmer than when it is doing a fast charge. 

On YouTube, there are a number of videos that offer a "fix" to the problem, but none of them mention that their fixes are just temporary.    Their "fix" mainly is to press down on the screen at different locations starting with simple taps and if that doesn't work then move to more firm presses with your thumbs until the screen comes on.  Since that's really the only solution I found (besides the "Call Google and get a replacement"), I gave it a try and it kinda worked.  Sometimes the display will come on but inevitably it will go dark.  I'm not sure if the pressing thing really helped or if it was just that the display just turned on while I was pressing.  I guess the theory is that the screen lost some kind of contact inside the body and pressing the screen will help it regain that contact.   Are there that many moving parts inside of a smart phone for something to come loose due to heat?  I think it's more plausible that the heat damaged some components so I don't think the phone will recover on its own.

Until I get the phone fixed or replaced, I wanted to make sure that the phone can continue to function enough so I can transfer the data over.  That meant keeping the phone somewhere cool and minimizing moving or using it.  The screen seems to work longer when the phone remains cool.  I tried to charge it one time and when it warmed up while charging the screen started glitching more quickly.  

Not having a mobile phone these days is really inconvenient.  We rely on it for maps, photos, and so much more beyond phone calling, but I guess a positive outlook is that it forced me to really disconnect from the grid while on vacation.  This experience also made me aware that Google has pledged to make their phones DIY repairable so you can now buy genuine Google parts to replace the screen, battery and camera.  That gives me a bit more confidence in getting another Pixel.  My experience with the Pixel has been good and I usually noticed the battery capacity dropping after a few years rather than any hardware failure so being able to replace the battery (even though it doesn't look super easy) is better.

I also learned that you can get the phone fixed quickly at a ubreakitifixit shop if one is nearby.  What I worry about sending a phone to a shop is that unless the phone is completely wiped clean then it might be possible for the shop to access the data on the phone.  These days we have so much data on the phone and if the problem is a broken screen then you can't even wipe the phone before sending it in.


Monday, January 16, 2023

Goodbye OnHub!

 On January 11, 2023  Google shutdown support for the 7 years old OnHub WIFI router.  Technically, Google shutdown the Google Home App support of the OnHub because OnHub devices were technically made and sold by other companies (either ASUS or TP-Link) depending on which OnHub you had.  However, since the software was all handled by Google, if the software doesn't work then you can't do anything with it.  It will still "run" but no configuration changes can be made nor can you see any info about the device.  The only thing you can still do is to factory reset and delete the whole network.  It's unfortunate that once Google decided to stop supporting the device that they are essentially dead.

I found the OnHub to have been a great WIFI router that was powerful and easy to manage.  It had enough customization for my uses and didn't require me to be an IT admin for it. Even though there were probably a few features that I wished it added, it was balanced enough that I was willing to sacrifice those features.  I wished that before its end-of-life, Google provided a way to download its setting and load it to a new network.  Even though I replaced the OnHub with a Google Wifi (not the Nest Wifi), I had to manually put in all the setting information including tracking down all the devices that connects to it so that I can give each a recognizable name.  Other settings like groups, schedules, reserved IPs, IP range, etc. all had to be manually entered.  Most of it is pretty quick but the device naming is a pain.

Over on the OpenWRT forum there are developers trying to give the hardware additional life by replacing the software on it so it is not reliant on Google and Google's cloud.  That would be great as it saves devices from going to landfills and honestly the hardware is still perfectly fine even to this day.

Setting Up Windows with CyberPower UPS

To set up a Microsoft Windows PC to power down during a power outage does not require installing any proprietary software.  

Simply create a new power profile in Windows and go to the advance setting to set the conditions you want to power down.  


For example, the machine can be configured to power down when the battery reaches a certain point.  This works because when the CyberPower UPS is connected to the Windows machine through a USB connection, Windows will sees it as being on battery power like a laptop.  It will see how much power is left.

More details about the battery probably will need the CyberPower software but for simple shutdowns no additional software is needed.

Setting Up Fedora Linux With Cyberpower UPS

These are my notes on how I set up my Fedora Linux desktop to listen to a Cyberpower UPS to known when to shutdown when there is a power outage.  This is only for one machine connected directly to the UPS through usb and doesn't cover when there are multiple machines that needs to be shutdown.

The simplest way to configure your Linux system to work with a Cyberpower UPS is probably to use Cyberpower's PowerPanel for Linux software, but I didn't use it since I wanted to see if I can use non-proprietary software.  Instead, I used the open-source Network UPS Tools (NUT) but it required a bit of manual work to get it configured.

All I want to do is to have my PC shutdown a few minutes after the power go out of the house so I bought a Cyberpower UPS and use the direct USB connection for it to communicate with the PC.

Once connected, check that Linux can see the UPS:

# lsusb

You should see the UPS listed among the list of USB devices.

Install the NUT software:

# sudo dnf install nut nut-client

This will install NUT and there are 5 key configuration files to be aware of:

  1. ups.conf - settings for UPS driver
  2. upsd.conf - settings for UPS daemon
  3. upsd.users - access control file for the UPS daemon
  4. upsmon.conf - settings for the UPS monitoring daemon
  5. upssched.conf - settings for scheduler daemon

Once NUT is installed, you can use one of its tools to identify the UPS and it will give you info that you can use in the config files:

# sudo nut-scanner

Add the information to the /etc/ups/ups.conf

[cps1500avr]
        driver = "usbhid-ups"
        port = "auto"
        vendorid = "0764"
        productid = "0501"
        product = "ST Series"
        vendor = "CPS"
        bus = "004"

The cps1500avr can be anything you want.  It is the name you'll be using to identify the UPS.  "usbhid-ups" is the driver for Cyberpower UPS.  All of this info came from the nut-scanner.

Add a udev rule, /etc/udev/rules.d/50-usp.rules,  so that Linux understand the UPS:

SUBSYSTEM=="usb", ATTR{idVendor}=="0764", ATTR{idProduct}=="0501", GROUP="nut" TAG+="systemd", ENV{SYSTEMD_WANTS}+="nut-server.service nut-monitor.service"

The TAG+ part is something I found on this blog for an issue with the system service not seeing the UPS and thus not able to start when the system starts up. 

Reload the UDEV rule:

# sudo udevadm control --reload-rules
# sudo udevadm trigger

Test that the driver can start and then start/enable the service:

# sudo upsdrvctl start
# sudo systemctl start nut-driver-enumerator.service
# sudo systemctl enable nut-driver-enumerator.service

Now we need to add the NUT user that will be used to monitor the UPS to /etc/ups/upsd.users

[nutmon]
        password = <password>
        uspmon primary
        action = SET
        instcmds = ALL

"nutmon" can be anything you like and then you can start the server and ask it to print out the UPS info that it sees.

# sudo systemctl start nut-server.service
# sudo systemctl enable nut-server.service
# upsc cps1500avr

Edit /etc/ups/upsmon.conf by adding:

MONITOR cps1500avr@localhost 1 nutmon  <password> primary

Start and enable the monitoring service

# sudo systemctl start nut-monitor.service
# sudo system enable nut-monitor.service

Finally, we need to tell NUT what to do when certain events happens such as when the battery is low or when it notices that the power is out.  Edit /etc/ups/upssched.conf (thanks to this article for the example)

# Gives the script to run the commands for various signals
CMDSCRIPT /usr/bin/upssched-cmd

PIPEFN /var/lib/ups/upssched.pipe
LOCKFN /var/lib/ups/upssched.lock

# Send alerts immediately on change in line power
AT ONBATT * EXECUTE onbatt
AT ONLINE * EXECUTE onpower

# (Optional) Silence the beeper after 2 minutes
AT ONBATT * START-TIMER mute_beeper 120
AT ONLINE * CANCEL-TIMER mute_beeper

# Shutdown after 5  minutes on battery (5 * 60 = 300)
AT ONBATT * START-TIMER onbatt_shutdown 300

# Cancel timer if power's restored
AT ONLINE * CANCEL-TIMER onbatt_shutdown

# Battery replacement indicated by cron'd quick test
AT REPLBATT * EXECUTE replace_batt

Then edit the command script you put in (in my case it is /usr/bin/upssched-cmd):

UPS_USERNAME="nutmon"
UPS_PASSWORD="<password>"
UPS_LINK="cps1500avr@localhost"


case $1 in
    onbatt)
        # make sure beeper is enabled
        upscmd -u ${UPS_USERNAME} -p ${UPS_PASSWORD} ${UPS_LINK} beeper.enable
        # alert
        message="Power outage, on battery"
        logger -t upssched-cmd "$message"
        ;;
    onpower)
        message="Power restored"
        logger -t upssched-cmd "$message"
        ;;
    mute_beeper)
         message="(2) minute limit exceeded, muting beeper"
         upscmd -u ${UPS_USERNAME} -p ${UPS_PASSWORD} ${UPS_LINK} beeper.mute
         ;;
    onbatt_shutdown)
        message="Triggering shutdown after (5) minutes on battery"
        logger -t upssched-cmd "$message"
        /sbin/upsmon -c fsd
        ;;
    replace_batt)
        message="Quick self-test indicates battery requires replacement"
        logger -t upssched-cmd "$message"
        ;;
    *)
        logger -t upssched-cmd "Unrecognized command: $1"
        ;;
esac
Test that it will shutdown by sending it the same shutdown signal from the UPS:
sudo upsmon -c fsd

If all goes well, get the service to start on boot:

# sudo systemctl enable nut.target
# sudo systemctl enable nut-driver.target

From now on, if the power outtage lasts more then 5 minutes (i.e. the UPS is running on battery), your system will shut down.  You'll need to manually turn the system back on when the power returns.

Notes

  • I'm not sure if something automatically started and enabled the specific driver (nut-driver@cps1500avr.service) or if I did it and just forgot to note it down.
  • This article from the Archlinux wiki described a problem that sounds like the same problem that the UDEV TAG part addresses but uses a different approach.

Sunday, January 15, 2023

Life for the Stadia Controller Post-Stadia

Update:  The official instructions to enable Bluetooth mode on the Stadia controller has been published.  The deadline to enable this is December 31, 2023.


Google Stadia will be shutting down on Jan 18, 2023 and while I wish Stadia had found more success the shutdown won't impact me that much given that Google is paying people back for the money they spent on Stadia game and hardware purchases.  I was surprised by this as I'm not sure I remember any other company willing to refund you money on things you bought years ago when they close.  One thought that I did have when the shutdown announcement was made was what will I do with the controllers?

The Stadia controller is pretty nice and well-built and it seem a shame to just throw them away.  I looked to see if I can use them with my PC which was possible but only through a wired connection... until now.   Despite Stadia going away, Google announced that they will release an update for the controller that will enable it to be used as a bluetooth controller.  

Monday, November 1, 2021

Unable to access the internet when using PiHole?

PiHole added rate-limiting for DNS queries to a very low 1000 queries per minute and enabled it by default even when updating an existing installation.  To change the rate limit (or turn it off), edit /etc/pihole/pihole-FTL.conf and add/edit the line: 

RATE_LIMIT=0/0

The format is [# of queries]/[seconds] so to set a limit of 1000 queries per hour would be 1000/3600.

Saturday, March 27, 2021

ASUS PN50 4300U as a portable system

I needed a computer for a remote location.  It would be used only for short periods of time a few times a year so it is not worth it to invest in a high end system, but it still needs to be powerful enough to do my work (including basic gaming for the kids).  In a more normal time, I might simply build a basic system for about $500, but the shortage of electronic components means many items are simply not available or have sky rocketed in price so that even low end systems now cost too much to build to make them worth it.

I considered getting a laptop but decided that a mini-pc fits this need better.  I am able to use it at home but can easily transport it to the remote location when needed.  My experience with the Asus PN50 has been very good so I decided to go with it again.  This time I opted for the lowest end model that uses the Ryzen 4300U with 4 cores/4 threads running at 2.7 GHz (base)/3.3.7 GHz (boost).  I went with just a single stick of 8 GB 3200MHz Crucial SODIMM and 500GB M.2 NVMe SSD.

For the monitor, I got a Lepow Z1-Gamut (2021) portable USB-C monitor.  It is easy to transport but also able to use at home.

  • $330 (PN50) 
  • $75 (storage)  
  • $46 (memory)
  • $160 (monitor)

Total cost came to $611 with no OS.  The price is reasonable given the current state of the world and portability it provides.  Note that if you don't have a keyboard or mouse, you'll need to provide one yourself.  I'm using it with a Logitech K400 Plus wireless keyboard that also has a track pad built in.  The keyboard is light and portable as well.

I had no problem setting up my previous PN50 with Windows and Linux, but did run into an issue with this particular unit when installing Windows 10.  During the installation, the lower part of the monitor was distorted.  I tried this on both the Lepow and on a existing monitor that I know worked.  The problem appeared on both.  I was still able to see the menu and install choices and the problem went away once the installer rebooted into configuration screen.  

Initially, Windows complained that it couldn't install to the drive and I worried that either the drive was bad or the memory was bad.  The ASUS BIOS doesn't normally show memory and it doesn't make it clear what drives it sees so it wasn't helpful in determining where the problem was.  I just took everything out and re-inserted everything.  This time, the installation worked.

After Windows finish installing, I couldn't access the internet through the ethernet connection to download anything and Windows itself couldn't get any updates and drives.  Ping/tracert from the command line worked but apps that tries to access the internet did not work.  I searched on Google, but none of the solution I found worked for me.

I had to use WIFI and that worked to get all the updates, drivers and patches.  Once those were all installed, using the Ethernet connection worked.  With Linux, I didn't experience this problem.

The Lepow monitor worked both through the USB-C and HDMI.  Using the USB-C, the video and power can be handled with a single cable between it and the PN50.   A problem occurred when it started to display something.  There was a whining sound coming it but it goes away if the brightness is turned up to 100% (the default setting is 30% - 50%).  Besides this issue, everything else worked as expected.

I'm not really sure why it was more troublesome installing this PN50.  Besides the CPU, the other difference with the PN50s I already own is the version of the BIOS so it is possible that the drivers on the Windows installation tool does match with this PN50 or its BIOS version.  I wish the BIOS settings were more descriptive, but fortunately everything ended up working and I didn't have to exchange any of the parts.

Boot time has been surprisingly slow from when the power button is pushed to when the Windows spinner shows up.  I can play Genshin Impact at medium graphics settings and I can run Tomb Raider at normal settings.  Although I don't think another 8 GB might help for running games on this CPU, it might help with running multiple apps in Windows so I'm thinking of getting another 8 GB to fill out the memory slot and then hopefully I'll never had to open up the case again!  Update:  I ended up getting another 8GB so it's now running 16GB of memory.

The Ryzen CPU supports up to 3200 MHz memory and that's what I got, but based on some benchmarks that others have published it doesn't seem like the 4300U benefits much from it vs 26xx MHz memory.  In this case, the 3200 was actually a few dollars cheaper then the 26xx ones so I went with 3200 anyway.

Sunday, January 17, 2021

My Systems (2021)

Updated 5/21/2023 with Beelink system

2021 brings upgrades to the computers in the house that has been fairly static over the past 7-8 years.   I got a couple of new systems and repurposed some parts from the old systems so this post is mainly to inventory the new configurations for my own reference.


System 1 (Asus PN50 4800U) [replaces system 3]

  • Ryzen 7 4800U [Zen2] (8 cores / 16 threads, base clock 1.8GHz, max 4.2GHz - 8 GPU cores - RX Vega 8, 15W)
  • 32 GB Crucial DDR4 3200Mhz  RAM (2x16GB)
  • 1TB Samsung 970 EVO Plus (M.2 NVMe interface) SSD
  • 500GB Crucial MX500 SATA SSD (2.5")
  • Intel WIFI 6, BT 5.0
  • 2 Dell U2311H (existing) monitors
  • 1 Dell U2421HE (24" 1080p) monitor
  • Dell AC511M soundbar
  • Unicomp Ultra Classic keyboard (2009)
  • Logitech Wheel Mouse

The PN50 replaced my trusty Shuttle DS87 as my daily driver.  All the components are new except for the two Dell U2311H monitors, keyboard and mouse.  I added a third monitor, Dell U2421HE, because it has ethernet and a USB-C interface that can connect with the PN50 for DisplayPort, USB hub and ethernet.  This lowered the number of cables between the PN50 and peripherals and reduced clutter on my desk.

Despite its small size, the PN50 is still very high performing, but you do pay a price premium for having something small AND fast.  I did lose some connectivity (fewer USB ports and only 1 Ethernet port).  The USB ports can be addressed with a hub and I use the monitor's built-in ethernet port for the one I loss since the PN50 only has one.

The Dell AC511M is a USB soundbar and can be attached to the monitor stand (not to the monitor itself).  It draws its power from the USB connection but I found three flaws with it: 
  1. It has no power button so it turns on when the PC turns on.  To use the audio-in jack and the speaker means the PC must be turned on. 
  2. The speaker has a hiss to it like many speakers but with no power button the hiss is always there.  I had to plug something into the headphone jack so I don't hear it.
  3. When something is plugged into the audio-in jack no audio goes through the USB.  If there are two audio sources (e.g. PC and music player) they need to share a connection.  I have two PCs connected to the monitor (one on display port and one on hdmi) and I can't have one play through USB and one through the audio in without plugging-and-unplugging the audio-in cable.  Instead, I have a cable from the monitor's audio-out to the soundbar's audio-in and each machine plays through the DP/HDMI outputs.
My ideal system would still be to have a something like the DS87 housing with a Ryzen 4700G (or 5700G), but those CPUs aren't very readily available and there is not DS87-like small form factor cases for them.  Update:  The day after I posted this, Shuttle announced this exact PC.  ^_^;  With my new monitor, though, I would like the new Shuttle to have an USB Type C connection, but at least if I wanted to get more power then I know the option is now out there!

System 2 (Asus PN50 4500U) (replaces system 4)

  • Ryzen 5 4500U [Zen2] (6 cores / 6 threads, base clock 2.3GHz, max 4.0GHz - 6 GPU cores - RX Vega 6, 15W)
  • 2x 8GB 3200 DDR4 so-dimm by SK hynix
  • Intel 660p Series m.2 500GB SSD
  • Intel WI-FI 6 (GIG+) + BT 5.0
  • *Crucial 128BG m4 2.5" SSD

This system replaces my wife's Shuttle XH61 system and is an upgrade across the board over its predecessor.

System 3 (Shuttle DS87)

  • Shuttle PC DS87
  • Intel Core i7-4790S Processor (4 cores / 8 threads, 8M Cache, base clock 3.2 GHz, max 4.0GHz, 65W)
  • Samsung 850 EVO 500GB 2.5-Inch SATA III Internal SSD (MZ-75E500B/AM)
  • 2 x Crucial 16GB Kit (8GBx2) DDR3 1600 MT/s (PC3-12800)
  • *Intel Network 7260.HMWG WiFi Wireless-AC 7260 H/T Dual Band 2x2 AC+Bluetooth HMC
  • *Samsung 840 EVO Series 120GB mSATA3 SSD

This Shuttle had been my reliable daily driver for over 6 years running Linux.  I repurposed an Samsung SSD and Intel wireless card from my Asus VivoMini to install Windows and add WIFI and bluetooth to the system.   The antennas that was in the VivoMini was hard to extract so I took the antennas from an old ASUS Chromebook laptop that wasn't being used anymore.  

The VivoMini was being used for kid's remote/distance learning but was a bit under-powered for handling some of the video conferencing features so this system will now take its place.

System 4 (Shuttle XH61)

  • Intel Core i7-2600S Processor (4 cores / 8 threads, 8M Cache, base clock 2.8 GHz, max 3.8GHz, 65W)
  • *Seagate 300GB 7200RPM HDD Cosair MX500 CT500MX500SSD1 500GB 2.5in SATA 6Gbps SSD
  • TP-Link USB WiFi Adapter for Desktop PC, AC1300Mbps USB 3.0 WiFi Dual Band Network Adapter with 2.4GHz/5GHz High Gain Antenna, MU-MIMO
  • 8GB RAM

This system was originally put together in 2012 (with an SSD) and even in 2020 was a perfectly good system for most tasks.  When running Windows 10 or some basic games (Minecraft, Don't Starve) it still felt pretty snappy.  I wouldn't try running any graphics intensive games on it.  

The SSD from this system was moved to the PN50-4500U (system 2) and replaced with a 2.5" Seagate 300GB 7200RPM hard disk drive that I pulled out of the Chromebook laptop that I pulled the antenna from.  After switching to the mechanical disk drive, the system felt noticeably sluggish.  A solid state drive makes a big difference!  

I'm keeping this system around for schooling.


System 5 (ASUS PN50 4300U)

  • Ryzen 3 4300U [Zen2] (4 cores / 4 threads, base clock 2.7GHz, max 3.7GHz - 5 GPU cores - RX Vega 5, 15W)
  • 16 GB Crucial (CT8G4SFRA32A) DDR4 3200Mhz  RAM (2x8 GB)
  • 500GB Samsung 970 EVO Plus (M.2 NVMe interface) SSD

This system is meant to be a more portable system for when I'm working at another location.  I paired this up with a portable monitor rather then getting a laptop since I don't need this to be a mobile system but one that I can easily transport.


System 6 (Beelink SER5)

This latest addition was added in 2023 as a secondary gaming PC.  The specs are decent given the price of under $300 including Windows.

  • Ryzen 5 5500U (6 cores / 12 threads, base clock 2.1GHz, max 4.0 GHz, 7 core GPU,  @ 1800 MHz, 15W TDP)
  • 16 GB DDR4
  • 500GB NVME M.2 SSD
  • WiFi 6
  • BT 5.2
The system came with Windows 11 Pro.

ASUS VivoMINI UN62


The ASUS VivoMini UN62 is a wonderfully small and quiet bare bones system with very good build quality.  It was this system that gave me confidence in getting the ASUS PN50.  I actually own 3 of these system and use them for different purposes which have changed over time (e.g. media station, always-on server for minecraft, etc).  More recently, however, the Raspberry Pi 4  have replaced the VivoMinis for some of the tasks.

The specs for my UN62s are:
  • Intel i3-4030U (2 cores / 4 threads, 1.9 GHz, 3 MB cache, 15W)
  • 16GB Crucial (2x8 GB DDR3-1600) 204-pin sodimm
  • Samsung 840 EVO 128GB msata3 SDD
  • Intel Network 7260.HMWG WiFi Wireless-AC 7260 H/T Dual Band 2x2 AC+Bluetooth HMC
Two served as the kids' computers until I upgraded their setup.  One was repurposed as the machine for schooling when remote/distance learning was put in place due to covid-19.  This system was replaced by System 3 and its drive and wireless card got moved to that system.

Raspberry Pi 4

  • Broadcom BCM2711, Quad core Cortex-A72 (ARM v8) 64-bit SoC @ 1.5GHz
  • 4G BLPDDR4-3200 SDRAM
  • 2.4 GHz and 5.0 GHz IEEE 802.11ac wireless, Bluetooth 5.0, BLE
  • Gigabit Ethernet
  • 2 USB 3.0 ports; 2 USB 2.0 ports.
  • Raspberry Pi standard 40 pin GPIO header (fully backwards compatible with previous boards)
  • 2 × micro-HDMI ports (up to 4kp60 supported)
  • 2-lane MIPI DSI display port
  • 2-lane MIPI CSI camera port
  • 4-pole stereo audio and composite video port
  • H.265 (4kp60 decode), H264 (1080p60 decode, 1080p30 encode)
  • OpenGL ES 3.0 graphics
  • Micro-SD card slot for loading operating system and data storage
  • 5V DC via USB-C connector (minimum 3A*)
  • 5V DC via GPIO header (minimum 3A*)
  • Power over Ethernet (PoE) enabled (requires separate PoE HAT)
  • Operating temperature: 0 – 50 degrees C ambient
  • Raspberry Pi ICE Tower Cooler, RGB Cooling Fan (excessive but looks cool on the desk).

The Raspberry Pi 4 is a small wonder of a machine that replaces what I originally used the ASUS VivoMini for and is significantly cheaper.


Friday, January 1, 2021

Installing Windows after Linux On Separate Disks

*** Update Feb. 28, 2021 ***

After having gotten both Linux and Windows dual-booting, I had to wipe and reinstall Windows 10.  This time, however, Windows 10 refused to install and gave a message saying "We couldn't create a new partition or locate an existing one."

This is caused by Windows being confused because there is another drive with a primary partition.  Even though you can tell Windows which drive you want it to be installed on, it still can't figure out how to install itself.  After trying a few different things, the solution was to unplug the other drive, install Windows and the plug the other drive back in.

If you are using GRUB as the boot manager the Windows entry will need to be updated or you'll get an error message when trying to boot into Windows.  To update the GRUB configuration with the proper Windows values you'll need to run grub2-mkconfig and write the results to the configuration file.

For MBR setups:

sudo grub2-mkconfig -o /boot/grub2/grub.cfg

For EFI setups:

sudo grub2-mkconfig -o /boot/efi/EFI/fedora/grub.cfg 

Leaving out the -o option will print the config to screen so you can see it first before overwriting the config.


*** Original Post ***

For my new system, I also added a second SSD that is intended for installing Windows 10.  My primary daily driver is Fedora Linux so I installed it first and it's on the primary drive.  

I don't use Windows very often but I might use it to play some games with the family so I'm okay with dual booting for this purpose.  I've not played with  dual-booting Linux and Windows in a very long time.  It's not something I recommend to someone who switch between the two operating systems frequently nor to someone who very rarely use one of them.  Rarely using one operating systems means it isn't updated so when it is needed there might be a lot of lost time getting the operating system updated and running again.

Setting up dual booting can also be a pain as one operating system might mess with the booting of the others (Windows tends to be the more frequent offender here as it doesn't really like to recognize non-Windows systems).  Most documentation I found suggests installing Windows first and then Linux so that the Linux boot manager (GRUB) can find Windows and add it to the boot options.   However, there's still a possibility that a Windows update can mess up GRUB and then it needs to be restored.  Another slight disadvantage is that it adds additional time for booting since there needs to be some pause to let users pick the right OS they want to run.

What I did was to install Linux first on one drive and then install Windows on complete separate drives so the boot manager of each drive is not effected by the other operating system.  I rely on the BIOS (yes, I know, force of habit to call it the BIOS) to select which drive to boot.  

After Linux was installed on disk "1", I installed Windows on disk "2" (Windows called it disk 0).  Whenever it rebooted, I made sure to tell the BIOS to boot of the Windows drives and not the default Linux drive.

Fortunately, the Asus BIOS's boot options include an Boot Override option to boot a specific drive without having to permanently change the boot order.  The other nice thing is that GRUB has the option to go back to the BIOS boot if I missed hitting the DEL key to get into the BIOS.  When I run Linux it is a no-op and when I need to run Windows it's a an extra 1-2 key strokes during boot.

The only issue that I had was that after Windows was installed there was an error message because of Secure Boot.  The simplest work-around is to disable Secure Boot in the BIOS so it can continue the booth process into either Linux or Windows.  I'm still learning about Secure Boot to see how to make it work with this configuration.

2021 PC - Asus PN50 4800U

Although I was very tempted to build a new desktop PC and get access to all the power goodness of the latest AMD Ryzen, I was hesitant giving up the small form factor that I had with my Shuttle PC DS87.  When the Asus PN50 with the AMD Ryzen 4800U became available I took the plunge.

The specs comparison between the previous and new PCs:

New PC:

  • Ryzen 7 4800U [Zen2] (8 cores / 16 threads, base clock 1.8GHz, max 4.2GHz - 8 GPU cores - RX Vega 8, 15W)
  • 32 GB Crucial DDR4 3200Mhz  RAM (2x16GB)
  • 1TB Samsung 970 EVO Plus (M.2 NVMe interface) SSD
  • 500GB Crucial MX500 SATA SSD (2.5")
  • Intel WIFI 6, BT 5.0

Previous PC:

  • Shuttle PC DS87
  • Intel Core i7-4790S Processor (8M Cache, base clock 3.2 GHz, max 4.0GHz, 65W)
  • Samsung 850 EVO 500GB 2.5-Inch SATA III Internal SSD (MZ-75E500B/AM)
  • 2 x Crucial 16GB Kit (8GBx2) DDR3 1600 MT/s (PC3-12800)

There are enough sites giving benchmarks so I'm not going to try to repeat what they've done, but I wanted to have something to show myself a tangible performance improvement.  It is generally during compilation when I wish things would go faster so why not compare compilation between the two systems?  The multi-core (8 vs 4) and multi-thread (16 vs 8) should benefit compilation even if the base clock of the 4800U is 1.8GHz while the i7 is 3.2GHz.  I'm expecting modern CPU is also more efficient per clock cycle then an 6 year old CPU.

I decided to time the compilation of OpenCV using the following

wget -O opencv.zip https://github.com/opencv/opencv/archive/master.zip
unzip opencv.zip 
mkdir -p build && cd build
cmake ../opencv-master/
time cmake --build .

i7 Results

real   28m57.219s
user   26m48.466s
sys     2m01.402s

4800U Results

real     36m48.166s
user     34m54.722s
sys       1m52.574s

How did this happen?  Was it that the 3.2-4.0 GHz too much for the 1.8-4.2GHz to overcome?  It did seem like during compilation all of the i7 cores was running at around 3.6 GHZ, but I suspected that the compiler was not actually taking advantage of all the cores of the 4800U.

I tried again using Ninja which automatically configures the build to use the multi-core CPUs.

make clean
cmake -GNinja ../opencv-master/
time ninja

i7 Results

real	11m28.741s
user	85m39.188s
sys	 3m23.310s

4800U Results

real      6m39.268s
user     99m03.178s
sys       4m8.597s

This result looks more like what I expected.  More of the system cycles were used on both the i7 and 4800U as more cores and threads were utilized but the real time was much shorter.  This just shows that for a lot of consumers fewer cores but faster clock speeds might be better for desktops (laptops and battery life adds another dimension) as they rely on the applications to be programmed to take advantage of the multiple cores.  That's why gamer systems usually will give up more cores for faster clock speeds since games aren't known for utilizing multiple cores.

Wednesday, December 30, 2020

Asus PN50 - 4500U Initial Impressions

When I opened up the box with the Asus PN50 my first thought was "wow, it is small."  I also had an Asus Vivo Mini which was also small, but the PN50 is even smaller and significantly more powerful.  The size is all the more noticeable when placed next to the Shuttle XH61 that it replaces.  The XH61 was already small enough to put into a drawer.  We're talking near Raspberry Pi level in size (although it is significantly more expensive) and it is amazing how much power is contained in this little box.


Specifications for this system:

  • Ryzen 5 4500U [Zen2] (6 cores / 6 threads, base clock 2.3GHz, max 4.0GHz - 6 GPU cores - RX Vega 6, 15W)
  • 2x 8GB 3200 DDR4 so-dimm by SK hynix
  • Intel 660p Series m.2 500GB SSD
  • Intel WI-FI 6 (GIG+) + BT 5.0

Opening up the case is straight forward.  Remove 4 screws on the bottom and slide the bottom plate in the direction of the arrow that is printed on it.  Immediately the memory and m.2 slots are visible and accessible.  Install them, close it back up and we're in business!

Everything booted up immediately and there were no issues with the Windows 10 install.  There were no driver complaints and the setup process went smoothly.  After Windows pulled the latest updates and rebooted, it took so long that I worried that it froze.  Eventually, it did whatever it is that it needed to do and restarted.  Everything came up, but since I used the Windows that was pre-loaded on the SSD, I had to go through and remove the unwanted software that it came with.  I added a 2.5" SSD as well and there was no problems recognizing it.

I installed Genshin Impact and played at both medium and high graphics quality and didn't see any issues with either.  Genshin Impact is not the standard to measure a system's gaming ability but if hardcore players aren't going to get a mini PC like this.  What this shows is that the 4500U is capable of running a current game in case there is a time when I wanted to play something on the PC.

Throughout the whole time, the unit stayed very quiet.  It is not completely silent but also not very noticeable.

The unit does come with WIFI and bluetooth and I was able to pair a PS4 Dual Shock controller easily and used it to play Genshin Impact.


There are two USB 3.2 Gen 1 Type A ports on the rear and one on the front.  There is also a USB 3.2 Gen2 Type C on the front and back.  Both support DisplayPort but the front on also support battery charging.  3 USB-A ports is a bit lacking so I connected a hub to one of the ports.  In total there are 5 USB ports and two of them can be used for connecting to DisplayPort monitors.

Along with the DisplayPort on the back and HDMI port, up two 4 monitors can be connected at once.  I normally run a two monitor configuration so this is plenty for my use. 

The front also SD card reader.  The audio-out jack is also on the front and the ethernet port is on the back.  I wished there was a second ethernet port and an audio jack on the back or side in addition to the front.  This would give some additional options to the orientation of the unit especially when it is mounted on the back of the monitor.  The Vivo Mini had this and it was a nice feature for the usb and mini

It is targeted for mobile but useful in a mini pc like the PN50 in keeping the heat down.   Benchmarks can be studied all day long but ultimately it'll be actual usage that matters.  If I don't post anything else about the performance of the 4500U it is probably because I'm finding the performance to have nothing to complain about!

New PCs - Asus PN50

The Asus PN50 series of computers are based on AMD's Renoir APUs based on their Zen 2 architecture and combines the CPU with integrate graphics.  The PN50 are mini computers that fits in the palm of your hands and utilizes the mobile versions of the APU (4300U, 4500U, 4700U and 4800U).  Note that these are generally bare bones systems which means that it doesn't come with memory or storage.  There are now enough info around the web and on Youtube talking about these APUs and also specifically about the PN50, but I had questions about these systems that none of the articles or videos talked about


I recently bought the 4800U and 4500U versions to replace my wife's desktop and my personal desktops of the past 7+ years and I want to answer the questions I had in case others also had the same questions.

Q:  Does the configurable port on the back mean that I can change it to what I want (VGA, HDMI, DisplayPort, Ethernet)?

A:  No, they are fixed.  You need to find the exact model you want with the type of port you want and some not available in some region.  I really wanted one with an extra Ethernet port but no seller in the US listed it.  The most common in the US has a DisplayPort.

Q:  Asus offers one version (4800U w/ 16GB memory, 500GB SSD and Windows 10 Pro) that isn't a bare bones system but it doesn't say what the components are.   


A: Here is what is in this system:
  • 2x 8GB 3200 DDR4 so-dimm by SK hynix
  • Intel 660p Series m.2 SSD
  • keyboard
  • mouse
  • Windows 10 Pro OEM (pre-loaded on the SSD)
The keyboard and mouse are pretty cheap quality feeling.

Q: Can it be used for playing games?

A:  Maybe not for hard core gamers or people wanting to play Cyberpunk and high graphics settings, but the 4500U works very well for playing games like Genshin Impact out-of-the-box and the default game settings.

The systems I got was the bare bones 4500U version and the non-bare bones 4800U.  I transferred the memory and SSD from the 4800U to the 4500U since I wanted 32GB of memory instead and a bigger drive.

The new configuration for the 4800U is:

  • Ryzen 7 4800U (8 cores / 16 threads, base clock 1.8GHz, max 4.2GHz - 8 GPU cores - RX Vega 8)
  • 32 GB Crucial DDR4 3200Mhz  RAM (2x16GB)
  • 1TB Samsung 970 EVO Plus (M.2 NVMe interface) SSD
  • 500GB Crucial MX500 SATA SSD (2.5")
The main feature that I sacrificed was the second ethernet drive that my current Shuttle PC has.  The PN50 also has fewer USB ports but does have a USB Type C port that is capable of DisplayPort.  I thought about just building a desktop with the Ryzen desktop CPUs or APUs when they become available, but I think that I will miss the small form factor which has help me avoid the temptation of wanting to upgrade because it sits out-of-sight.  :-)

I believe that running with the base clock of 1.8GHz is fine and it is when I compile stuff that I really need more speed and power over my existing system.  Compiling C/C++ code are really the only times that I might think about getting a new computer.  Occasionally, I might wonder if I can play a game but since I moved over to console gaming (to avoid the constant upgrade cycle), but generally even my 7+ years old machine have remained speedy.

This is really more a splurge buy for myself because of the holidays and that my wife wanted to co-op Genshin Impact on something other then her mobile phone.

There are some competitors to the PN50 including the Asrock 4x4 Box series which are just as small and comes with dual lan interfaces.  However, they are completely sold out everywhere.  I've previously owned the Asus Vivo Mini and was very happy with it for both its quality and how quiet it is so I've been partial to the PN50 when it was first announced.

Monday, February 17, 2020

Dayfarer Backpack For Everyday Use (Long Term Review)


I no longer have to bring as many things to work with me and I started to bike to work on some days instead of driving.  Because of the former, I no longer needed needed the degree of organization that the eBags Professional Slim offered.  Because of the latter, I needed to bring a change of clothes (including shoes sometimes).  The Professional Slim is great with all of this organizational pockets and the especially its device garage, it didn't offer much room in its main cavity for bulky items such as clothes and shoes.

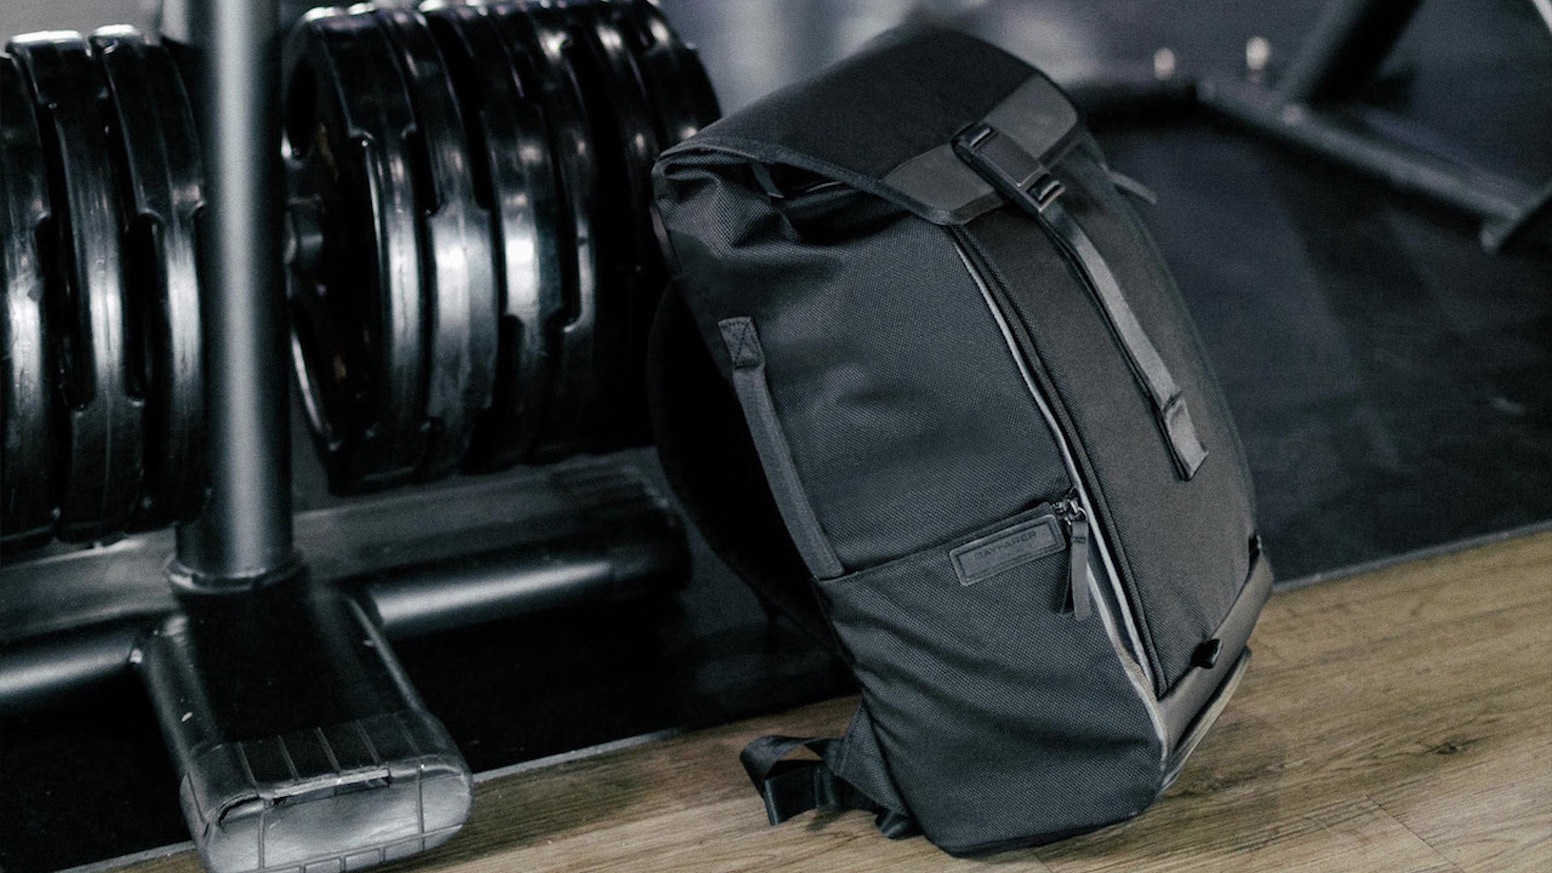
I started to look for a different backpack and I found the Dayfarer.  The Dayfarer is a minimalist everyday carry (EDC) backpack that is designed for gym and work with an emphasis on convenience.  I've been using it as my daily backpack for the past year.

A sleek and functional backpack for everyday use, which blurs the line between sport and work.

The Dayfarer offers minimal organization but a lot of convenience.  Whether it is the magnetic clip that can be operated with a single hand, shoulder strap pocket, easy-access side pockets, front-and-back hidden pockets, top and side handles, and luggage handle pass-through, each feature of the backpack is meant to be easy to use and/or access.  I really like backpacks with side handles because I find it easy to grab to put in-and-out of the car.  The sides pockets can be access without having to take off the backpack and the front pocket can be access without opening up the backpack.

The separate laptop pocket can also be accessed without opening up the main compartment.  Most of my most needed stuff are put into these pockets so I don't normally have to go into the main compartment.

When I do need access to the main compartment, the magnetic locking clip can be operated one-handed.  The kinda-of roll-top style turns out to make the backpack very flexible and easily expandable when more space is needed but more compact when it does't need to.  The backpack can also open flat to let you see and access the entire contents at once.  Most of the time, I don't open it up flat and just access it through the top.  I didn't find Dayfarer's info to really show this but reviewer Chase Reeves shows it on his video review.


There's not much organization on the inside besides two pockets so it is basically a large bag to put things in.  When I do need to bring a bunch of small items, I use my Peak Design Tech Pouch and just put the entire pouch into the main cavity.

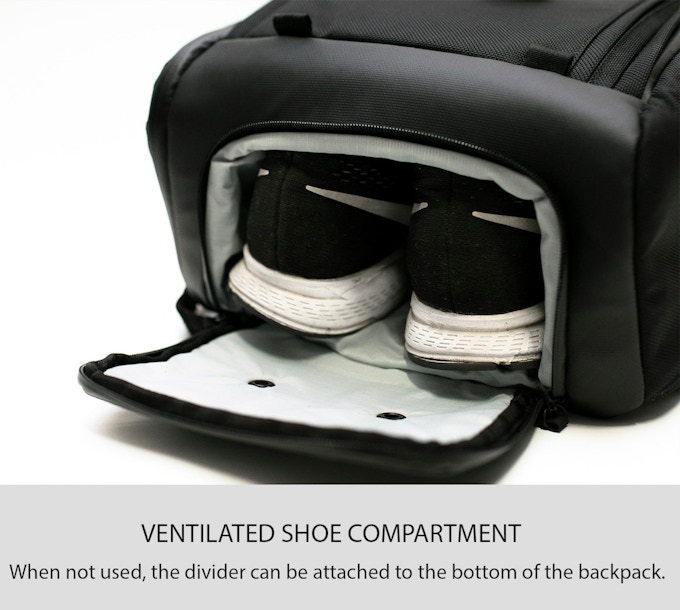
The bag has a ventilated shoe compartment with a waterproof separation from the make compartment so it can be used to carry shoes or whatever items (e.g. dirty clothes) you you don't want to get mixed
in with your other stuff.


This bag offers a lot of flexibility in how and what it carries.  I've mentioned how it's roll-top like design makes it very expandable but for those who need more space, the backpack has loops on the bottom so you can hook things like your tripod or yoga mat to it rather then put them into the bag.

The Dayfarer is not very heavy at 2.5lbs.  The materials are high quality (waterproof balistic nylon, water resistent YKK zippers, etc.) and it is well constructed.  This is not a fancy backpack but a well designed one.  The pricing is reasonable although be aware that this is shipped from Germany and will take time.  My order was shipped within a few days but once it reached DHL there was no updates for nearly 2 months before it arrived.

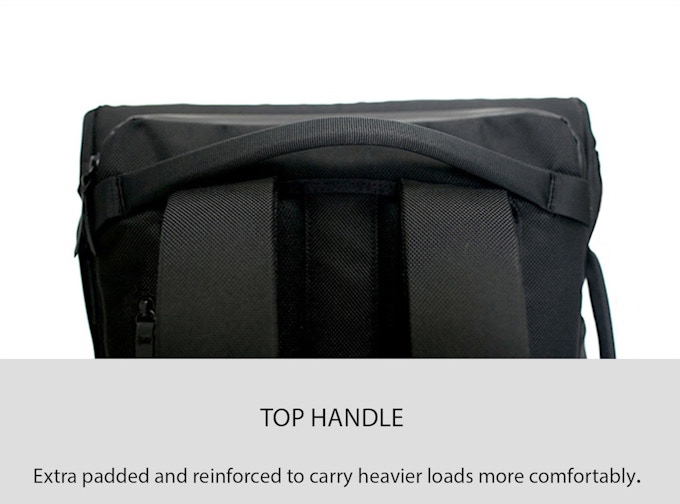
The only thing I wish it was better on is for the top handle to be connected to the main body rather then the back.

The reason being that if you forgot to zip up the laptop compartment then when you use the handle it is pulling from the compartment's back.

After a year of use, the backpack has held up well and doesn't show any wear-and-tear except for some scuff mark on the buckle.  I really like this backpack and I've used both as a daily work bag but also when going out on the weekend when I think I might need to carry something.

Sunday, February 16, 2020

Modern Day HP Voyager Calculators by Swiss Micros

There are two particular electronics devices that even decades later are still used and considered superior to any modern competitors: the IBM Model M keyboard and the HP Voyager line of calculators.  Fans of these devices loving hold on to these devices even after decades of active use and will only give them up if it's pried from their cold dead hands.  While nostalgia does play a role in generating love for "retro" devices (as we see with the release of retro style gaming console), what sets the IBM Model M keyboards and HP Voyager calculator is that these devices are just really good at what they do and their style and design are no longer being manufactured (well, at least no longer mass produced by the original manufacturer).

Do a search on Google and Youtube you'll easily find fan sites that will explain in glorious details what makes these devices so special.  I have an HP 15C and it is as great as what people say it is.  From build quality, legendary battery life (we're talking about the battery lasting years/decades, folks) to the "feel" of the keys as you type, this is a phenomenal calculator that I've come to appreciate a lot more now then when I first started to use it.

The HP Voyager calculators are more niche then the the IBM keyboards.  People still regularly use a keyboard while the use of a dedicated calculators are now mostly limited to academic and research settings.  Even when these devices were sold by HP, it wasn't sold at the scale which IBM's keyboard were sold at, but once you've convinced yourself on how awesome these calculators are the question is how to get one many hasn't been sold or made in decades.

However, I'm a software engineering by trade and it was not until after I started working (and long after its production run in 1989) that I discovered that HP had made a version for computer programmers:  the HP-16C.  Once I did find out about its existence, I dreamed about owning one, but the HP-16C is even rarer to find then the 15C and as much as I might desire one I'm not going to pay whatever the asking price is when it does make a rare appearance on the auction market.


Then one day, I came across a company called Swiss Micros that was started by Michael Steinmann.  Apparently, Mr. Steinmann set out to clone the HP Voyager series and started to do so in 2011 with "mini" replicas that are about credit card size.  While these are cute, I wasn't too interested, but then Swiss Micros began to make full size replicas and that caught my attention.  Now I had a chance to experience a 16C directly so I ordered the Swiss Micros DM16L.


From its website, it's obvious that this is a small operation and it's selling a niche device, but the device shipped quickly.  It took awhile for it to actually reached me, but it arrived well packaged.  It doesn't use any fancy marketing box that modern devices tend to come in, but that's better for the environment!

My first impression was "wow, this thing feels solid".  These is a high quality RPN calculator for professionals.  I immediately tried out the keys and it had a very pleasurable tactile feel to them.  On its own merits, it is a top tier calculator, but people are likely buying this because they want an "new" HP Voyager.  I feeling that it does capture the spirit of the Voyager but this isn't an exact clone (and not just the logo and name).

The feel of the keys aren't the same which is noticeable when used side-by-side, but if you haven't touched an original in years then my guess is that you'll find just as much satisfaction with the DM16.  The lettering on the key caps are printed on the keys rather then injected into the key itself.

The overall dimensions are nearly identical but the LCD screen is bigger, the fonts are larger and there are multiple fonts to chose from on the DM.  I find the Voyager font to be cleaner and easier to read but font style is subjective.

The DM manufacturing is not as polished (both figuratively and literally).  The titanium casing around the LCD display showed the machining line and felt rough and not polished like the Voyager.  I'm not sure if it is intentional to show the grain of the metal (which is more yellow than the silver on the Voyager) but I suspect it isn't.  The rest of the case is well manufactured and everything is put together solidly.

If you noticed that the LCD has some spots/specs stuck in it even when turned off you can put the calculator in direct sunlight for a few days and they will disappear (easier and faster then to send it back to Swiss Micro and getting an replacement).

Would I recommend the Swiss Micro calculators?  As a quality RPN calculator, the answer is "Yes", but for most people it might be an overkill and pricey.  These aren't the calculator you want to just pick up and throw into the kitchen utility drawer.  For fans of the HP Voyager, fans of RPN calculators, and professional looking for a dedicated calculators then this is a solid piece of equipment to add to your toolkit.

Saturday, August 17, 2019

Asus CT100 Chrome OS Tablet

Although Google is indicating that they are getting out of the tablet market and the Pixel Slate is their last tablet, it doesn't mean the ChromeOS tablet is dead.  Company like HP, Acer and ASUS continue to work on using ChromeOS for tablets.  HP's approach is still directed more towards a 2-in-1 laptop/tablet experience while Acer is targeting the education market (but it seems like it falls short on performance).  

Of all of these, ASUS' CT100 tablet has gotten me the most excited!


ASUS is also targeting the CT100 towards education but it is perfectly suited for anyone looking for a quality 10" tablet.  Instead of an premium metal body of the Google Pixel Slate and HP Chromebook x2, the CT100 has a more rugged texture body with rubber borders to offer better protection.  It makes sense since it is targeted towards school and kids, but for those who usually put a case on their tablet for protection (and thus covering up the premium finish) this would actually save you from having to do that.

The weight and balance is good for one hand use and although it feels thicker then the Slate since it doesn't need its own case in the end it might actually be thinner.

The screen is great and is both sharp and bright.  It comes with a stylus including a place to hold it.  It's capable of running web apps (ChromeOS gives you a full fledged Chrome browser), Linux and Android apps (it seems to run Android apps better then my Pixel Slate).

The performance of the tablet is very good both for web browsing and Android apps.

The price is $330 is very good for a tablet of this quality.  Unless you need a 12" screen or 2-in-1, I would say that this is the tablet to get!


Google Pixel Slate - Mobile Workstation

I found myself needed a new tablet when my Pixel C tablet died.  The Pixel C was a very nice Android tablet and I've gotten used to that form factor (10").  I mainly use a tablet at home and primarily for consuming content such as reading and watching videos as well as handling some home automation controls.  For Android, I prefer the stock Android experience which I'm most comfortable with, but with Google having stopped making Android tablets (including the Pixel C) there aren't many options out there so I decided to give the Google Pixel Slate a try.

Image result for pixel slate

Pixel Slate & ChromeOS


Despite sharing the "Pixel" name the Pixel Slate is a ChromeOS device and Google's first (and only?) ChromeOS tablet.  I'm a big fan of ChromeOS but have only used it as a laptop.  Even when I'm using the Pixelbook, which can flip to be used in tablet form, I've only used it as a laptop since I find  it too bulky to use as a tablet.  The Slate doesn't come in a 10" form factor (ASUS has released a 10" ChromeOS tablet that has been excellent) and is only available with a 12" screen.  While the Slate can be viewed as a Pixelbook without a keyboard, that doesn't do it justice since it feels a lot more comfortable when held then a keyboard-less Pixelbook.  Still, I was somewhat hesitant to use a 12" tablet, but there are additional advantages with the Slate that ultimately led me to get it: Android support, Linux support and laptop mode.

When a keyboard is attached, it behaves just like a ChromeOS laptop.  This is essentially a 2-in-1 device which is useful when traveling since I don't need to bring a tablet and a laptop with me.

ChromeOS also don't get re-skinned like the Android launcher by OEMs so the experience is the same across all devices across all manufacturer.

Android Apps


ChromeOS now supports running Android apps so I can still access my Android apps although I prefer to use the web version since I now have a full Chrome browser.  In tablet mode, though, some apps are much more intuitive to use the Android version.  It's pretty clear that many web applications assume the user is using a desktop machine rather then one that uses touch as it's main interaction mode.   These are the times when the Slate will give the impression that ChromeOS is not very polished when compared to Android but in general it seems to be more on the app developer then the OS.

I have noticed that sometimes Android apps tries to start and either takes a while to come up or run into an issue.  I usually restart the tablet in these situation and the issue is fine.

Linux


ChromeOS is now capable of running Linux so I can do all my software engineering work without having to switch to developer mode. 

This a big deal for me as this allows me to just bring the Slate instead of a tablet and a laptop pair.

Accessories


I mainly will use laptop mode when I'm traveling.  While the on-screen keyboard works fine when I'm  using the Slate at home as a tablet, when doing a lot of typing it is still easier to have a physical keyboard.  I bought the Brydge C Bluetooth keyboard.  This keyboard can also be connected directly to the Slate and used in wired mode.

Brydge C-Type

For a mice, I use the Microsoft Surface mouse and I have a Pixel Pen.

At home, I use a hand strap to make holding the tablet with one hand a little more secure and when traveling I use an Incipio Carnaby Google Pixel Slate Folio  case for a little bit of protection, to stand up the Slate and can hold the pen.

Performance


The knock against the Pixel has been (1) performance and (2) sometimes it doesn't feel very "tablet" like.  The latter is primarily because the web apps often are built assuming you're using a mouse+keyboard and android apps often are designed for such a big screen.  I personally found it to be fairly minor but if you use Android apps exclusively then sticking with a Android tablet might be better.

For the former, most of the negative stems from the low end Pixel Slate that were too under powered.  I have the i5 model and the performance has been fine.  The only time where I felt the Slate is slow is when powering on.   It takes a few seconds after hitting the power button before seeing the Google logo appear (this is when the Slate is completely turned off).  Recovering from Sleep is fast and the screen can be unlock with your finger print.

Conclusion


The Pixel Slate is a great dual purpose device.  When used as a tablet it works pretty well but starting Android apps don't feel as fast.  When used as a Chrome laptop, add the keyboard, mouse and folio case and it will be a very serviceable laptop especially for traveling or as a secondary computer (and primary tablet).

Sunday, April 28, 2019

eBags Professional Slim Long Term Review

I've been using the eBags Professional Slim as my every day carry (EDC) backpack for about a year and a half.  It is a well thought-out, high-quality and great value backpack that is great for techies and urban professionals.  I've not had any problems with it the 1.5 years that I've been using it for work and I would recommend it to others.  However, I am planning to change to another backpack soon for reasons not related to the backpack itself.


Nomatic Travel Pack Long Term Review

I've now had the chance to use my Nomatic Travel Pack (not to be confused with the Nomatic Travel Bag or Nomatic Backpack) on multiple trips (both domestic and international) so here is my long term review of this backpack.

Saturday, February 2, 2019

Nomatic Travel Pack and Peak Design Tech Pouch Hack

I've been intrigued by the Peak Design Tech Pouch (Amazon) because of its promise of "enormous spatial efficiency, letting you pack more into a smaller space while keeping your items neatly organized and easy to find."  For cables and small items like flash drives, cable adapters, etc. I've been using the Bagsmart Travel Organizer but for larger bulkier items like the laptop's power adapter, usb wall chargers, etc. I've been using the various organization pockets of my Nomatic Travel Pack backpack.  The main downside is to to get access to the larger items requires always having the backpack with me.  When traveling it becomes a bit cumbersome such when having to access the backpack on the plane.

The Nomatic doesn't have any external loops that is often found on other backpacks for hooking things onto but it does have two loops near the base for attaching its waist straps.  The Tech Pouch has two loops so I decided to attach the pouch to the backpack through these external loops.  This allowed me to not use any space inside the backpack and have easy access to the items.


When setting the backpack down, the pouch moves to the back so the backpack isn't sitting on top of it.


When the backpack is being carried the pouch falls underneath the backpack comfortably.


The pouch is not as wide as the backpack so to allow the carabiners to reach and allow enough slack for the pouch to move, I got a 12" tie down loop straps that I ran through the pouch's loops and attached the carabiners to the strap's loops.

The set up worked out very well.  When I was on the plane, I detached the pouch from the backpack (which I put in the overhead bin) to keep with me.  When I was at the office, I can access everything I needed from the pouch instead of going through the different backpack pockets and having to return everything back to their place in the backpack. 

Saturday, September 22, 2018

Nomatic Travel Pack First Trip

I previously wrote about my first impressions of the Nomatic Travel Pack and now I've had a chance to use it on a trip so here are my thoughts.


What I Like


In its non-expanded form, the Travel Pack external dimensions doesn't feel that much bigger then my everyday carry backpack.  It held everything that I normally bring along when traveling with little effect on the shape of the backpack.  It easily can fit under the seat on an airplane and it stayed upright without problems.


Access to the main compartments were good and accommodating since it provide access from either side and the top.

There are plenty of organizational pockets, pouches and compartments so everything had a place and stayed in place.

There are cable pass-throughs  between the main compartment, easy access pocket and the front compartment.  This allowed me to have my main battery in the inner side pockets of the main compartment then run a charging cable to the easy access pocket to charge my phone and to anything in the front compartment without having the cable getting exposed on the outside.  There is no pass-through to the laptop compartment unfortunately so I can't charge the tablet without running the cable along the outside.


It was comfortable to carry even when full.  For this trip, I didn't use the waist straps.

What Is So-So


The ability to open up the laptop compartment is meant for the convenience of going through TSA checkpoints faster without having to take out the laptop, but that only works because TSA wants to see the laptop unobstructed.  Having the tablet pocket on the side as the laptop meant that TSA will likely ask you to take one of them out so it kind of defeats the purpose.  If it is on the opposite side of the compartment like how the Atlas Everki has it then it will be more convenient.

The quick access pocket at the top is not very big and I found it to be a tight fit for my phone.  I really can't put much in there if I want the phone to be there.  Normally I'd like to stick my phone there when I go through airport security rather then leaving it in the bin where I might forget or make it easier for someone to snatch.

The water bottle holders were a tight squeeze especially if there are bulky items in the inner side pockets.  It does stretch so it does fit a typical water bottle but it's not easy to drop-in.  For me it was a two-handed operation.  I definitely missed the Everki in this area.

The hidden security pocket along the back of the backpack was also very tight.  It's good for paper money and other thin items but when I put in my wallet, I found it slightly cumbersome to fetch it back out.

The Travel Pack can hook onto your rolling luggage but it goes on sideways.  I'm not used to accessing items from the side but for the main compartment  it's fine.  For the quick access pocket and front compartment, it feels more awkward and I worried that something might fall out when I open the zipper.

The outside material feels more plastic-like then what I'm used to.

What is Silly


The main compartment has 4 zippers.  The two middle zippers can be locked together to prevent it from being opened.  The two outside zippers doesn't lock to anything so even if you locked the two middle zipper together, you can still get access to the main compartment with the two outer zippers.

Initial Thoughts


Overall, the Travel Pack performed as advertised.  When I first packed it and when through the security checkout, I wasn't as happy with it but it grew on me as I traveled.  I had to adjust a bit with how I organize and access items.  I would probably sacrifice a bit of form for function such as the bottle holder pocket from the Everki (see comparison between the Everki and TLS here), a bigger quick access pocket and being able to hook to luggage up-right instead of sideways.

I'm not a 1-bag traveler where I would just use one bag to store everything so I don't expect to use it in expanded form much, but even in its normal form there was plenty of space for additional stuff in the main compartment that I didn't use on this trip.